Proper installation of a water floor heating system is essential for its long-term performance, ensuring that it operates at its best within your home and helping to save you energy. Warmup provides thorough installation guidance for all our heating systems including video walkthroughs. In this step-by-step guide, we’ll spotlight the tips shared in the installation video for the popular VLo Ultra-12 Low Build System. You’ll learn:
- How to prepare the subfloor of your room
- The smoothest way to install the Ultra-12 panels
- How easy it is to fit the heating pipes within the panels
- How to set up the UFH system’s manifold and heat controls
- The best methods to install your floor finish over the system
1. Prepare the subfloor
Before installing a new floor heating system, it’s essential to ensure that the subfloor is well prepared. A clean, dry, and smooth subfloor is crucial to ensure proper bonding of the system so it’s a good idea to sweep the area free of any debris, oil or dust. The cleaned subfloor should meet the SR1 standard to guarantee that it is sufficiently level and won’t hinder the heating system’s performance.
It’s also worth noting that the VLo Ultra-12 Low Build System should only be laid over structurally sound subfloors that can support the additional load of the system.
2. Prime your subfloor and apply your adhesive
Once your subfloor is ready, you can begin priming it in line with the adhesive manufacturer’s instructions.
In dry environments, a high-temperature acrylic adhesive is ideal for bonding the Ultra-12 panels to the subfloor. In areas where moisture might be present, such as bathrooms or kitchens, it’s advisable to use a compatible S1 or S2 flexible tile adhesive.
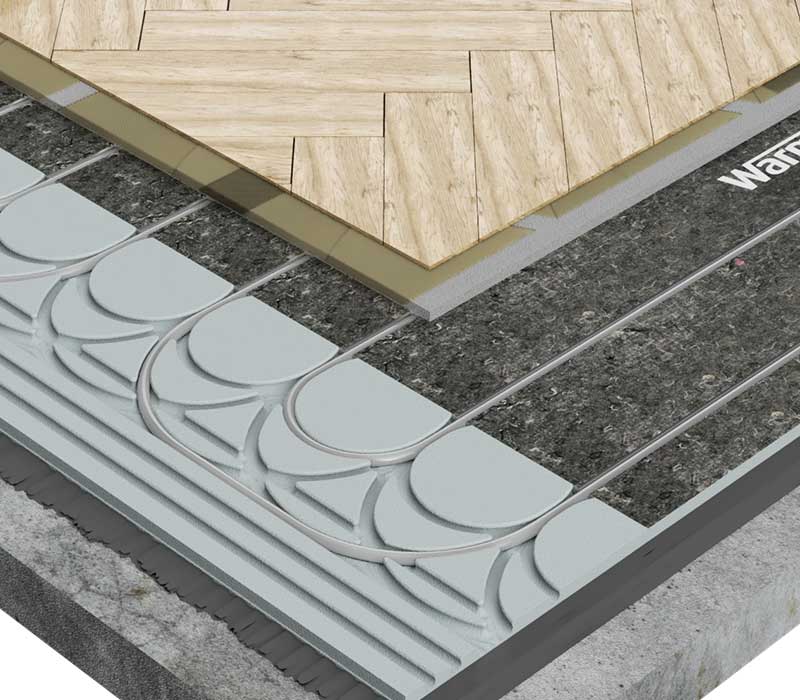
3. Install the Ultra-12 panels
The Ultra-12 system utilises dedicated heating, end, service and plain panels, allowing for a hassle-free installation in rooms of any shape or size. Before fitting them onto the subfloor, you can cut the panels to their appropriate size and, if required, cut new channels into the panels for the pipework.
The panels should be fitted according to the layout detailed in your project’s working drawings. After applying the adhesive to the subfloor, each panel can be installed by hand: simply press the panels down firmly. If your layout requires bends and corners, use the curve service panels to match the necessary angle. For straight sections, place the panels tightly together to create a continuous surface – always ensuring there are no gaps in the system that might disrupt the heat spread. For areas that do not require underfloor heating, such as beneath kitchen units or larger fixed objects, use plain panels.
4. Fit the floor heating pipes
The VLo Ultra-12 heating pipes can be installed by hand and should be measured and cut to the necessary length. Again, the pipe layout should follow the project’s working drawings to ensure that the system is installed correctly.
Begin by installing the pipework from the manifold location. You can use Warmup pipe bend supports to hold the flow and return pipe as it exits the floor towards the manifold. All pipes should be fitted tightly into the grooves of the panels to ensure they are securely fixed and will not move during the heating process. Looking for more information about Warmup’s Manifold? Read our in-depth article to find out everything you need to know.
A floor sensor is also essential for controlling your new floor heating system. Create a 6 mm channel in an Ultra-12 panel to recess the sensor. The sensor should be installed at least 300 mm into the heated area to ensure it accurately controls the temperature of the system.
5. Fit your floor finish
The VLo Ultra-12 Low Build System can used with a wide range of floor coverings. If you are installing the system with floor tiles, you can tile directly onto it: simply add your layer of tile adhesive directly to the system and fit your tiles as directed.
For floating floors, a floor heating-compatible underlay is required to prevent damage to the system. For softer floor coverings such as carpet, a screed replacement system such as Warmup’s HiDECK 18 is recommended.
6. Set-up your Warmup thermostat
The final step in the installation process is connecting the heating system to the thermostat. A floor heating thermostat controls the temperature of the system and can enhance the energy-efficiency of underfloor heating. Refer to your thermostat’s installation instructions to ensure it is connected correctly.
Considering the VLo Ultra-12 Low Build System for your home?
Adding only 18mm to the floor build up, the VLo Ultra-12 Low Build System is an ideal water underfloor heating solution for both renovation and new-build projects. It can be used with both traditional boilers and more sustainable heat pumps. If you’re interested in purchasing the Ultra-12 System, get a free instant quote today. Simply enter a few details of your project and we’ll tell you exactly how much a Warmup system will cost for your home.
Interested in watching more video guides for Warmup’s range of floor heating systems and controls? Visit our YouTube page to discover more expert tips.


![Thumbnail [200x250]](/wp-content/uploads/Electric-Category-Page-Image.jpg)
![Thumbnail [200x250]](/wp-content/uploads/Hydronic-Category-Page-Image-1.jpg)
![Thumbnail [200x250]](/wp-content/uploads/6iE-Projects.jpg)